User Roles: HR Staff Action Officer, System Administrator
Last Updated: Nov 07, 2023 9:50 am
To access the Create/Edit Contract form from the Employee Demographics screen: Other > Contract

Completing the "Choose Contract" Screen
You will see the contract(s) previously created for the employee (example below).
You must indicate whether you are creating a new contract or editing an existing contract.
To update an existing contract, click the Edit button on the row for the contract that you wish to update.
To remove an existing contract, click on the Remove button on the row for the contract that needs to be deleted.
To create a new contract, click on the Create New Contract button.

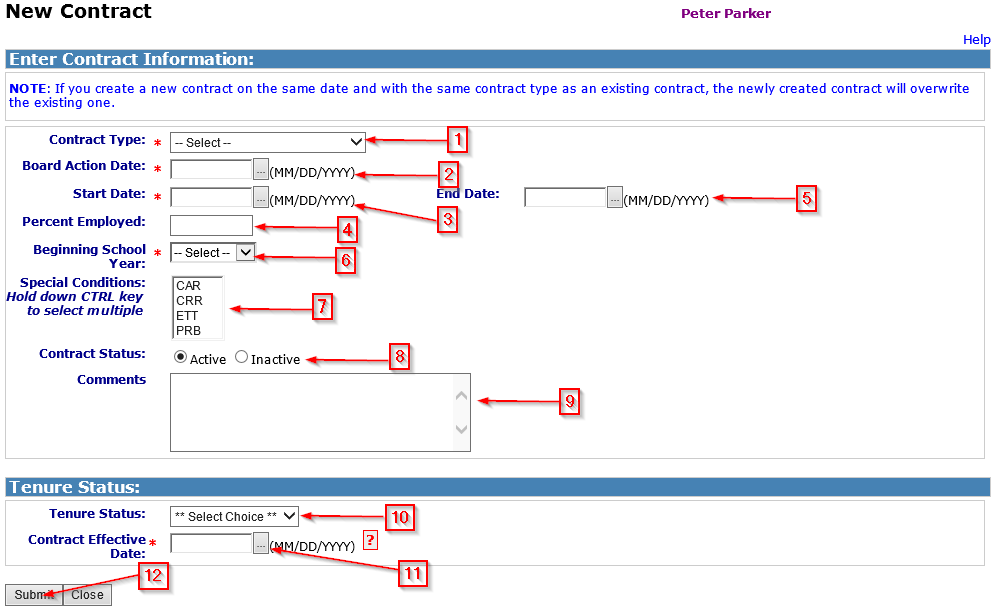
Completing the Create New Contract Template

The above is the default view when the form opens. You will see the appropriate fields for input depending on the 'Contract Type' selected.
For best results enter as much information on this screen as possible. The Red * indicates a required field and must be completed prior to clicking the Submit button.
Below is an explanation for each identified function.
Fields to Complete
1) Contract Type: Select the type of contact for the employee from the drop down menu.
Contract types are system defined with the structure and verbiage mandated by N.C. General Statute 115-325.
The contract types are:
- Teacher - used for full-time teachers who are employed with 120 days or more remaining in the school year when they start.
- Temporary Full-Time - used for full-time teachers who start with less than 120 days remaining in the school year when they start. This contract is also used for licensed individuals serving in an interim (covering an approved leave less than six months) role.
- Temporary Part-Time - used for all part-time licensed employees.
- 'Locally Defined' - You can create other contract types. See Contract Types.
- Obsolete and unavailable for selection as of February 2014.
- Career - used as the last contract for a licensed employee who has met the state statues for gaining Tenure with a NC School System.
- Probationary - used for licensed individuals that are employed in a Full-time Permanent position with at least 1 clear teaching area on their NC Teacher's License and have the possibility to work at least 120 days during the regular school year.
2) Board Action Date: Enter the date of Board action in MM/DD/YYYY format or click on the icon next to this field to select the date from the calendar.
3) Start Date: Enter the beginning date of the contract in MM/DD/YYYY format or click on the icon next to each field to select the date from the calendar.
4) Percent Employed: Used to indicate the percentage that an individual will be employed during the current contract term. This is not a required field, but is highly recommended to clearly outline the amount of time an employee is being contracted for during the time period indicated.
5) End Date: Enter ending date of the contract in MM/DD/YYYY format or click on the icon next to each field to select the date from the calendar.
6) Beginning School Year: For teacher contracts, select the appropriate school year from the drop down menu.
7) Special Conditions: Select the codes associated with special conditions to be printed on the contract. Contract condition codes are locally defined and entered using the Contract Conditions program located on the LEA Configuration page. You may select multiple Contract Conditions by holding the "CTRL" key as you click to make your selections.
8) Contract Status: The default is Active and should be left that way unless a specific action warrants a change to Inactive.
9) Comments: The information contained in the Comments section DOES NOT appear on the contract when printed. This data entry field is used to note issues each spring when using the HRMS System to review each individual's credentials to determine their employment eligibility.
10) Tenure Status: (Tenure status has been frozen as of 2013-14) Note that with release 6.4 of HRMS, only locally defined codes are available. Locally defined codes are entered using the Tenure Status form accessed from the LEA Configuration page.
11) Contract Effective Date: For Teacher Contracts enter the effective date in MM/DD/YYYY format or click on the icon next to this field to select the date from the calendar. For Temporary Full-Time and Temporary Part-Time contracts the Contract Effective Date will be the same as the Contract Start Date.
12) Submit: Review all information and click the "Submit" button to create the contract.