User Roles: HR Staff Action Officer, System Administrator
Last Updated: Jan 02, 2024 3:30 pm
Step #3 - Setup (Establishing the New Contract Values)
This section will show you the steps for creating new contracts.

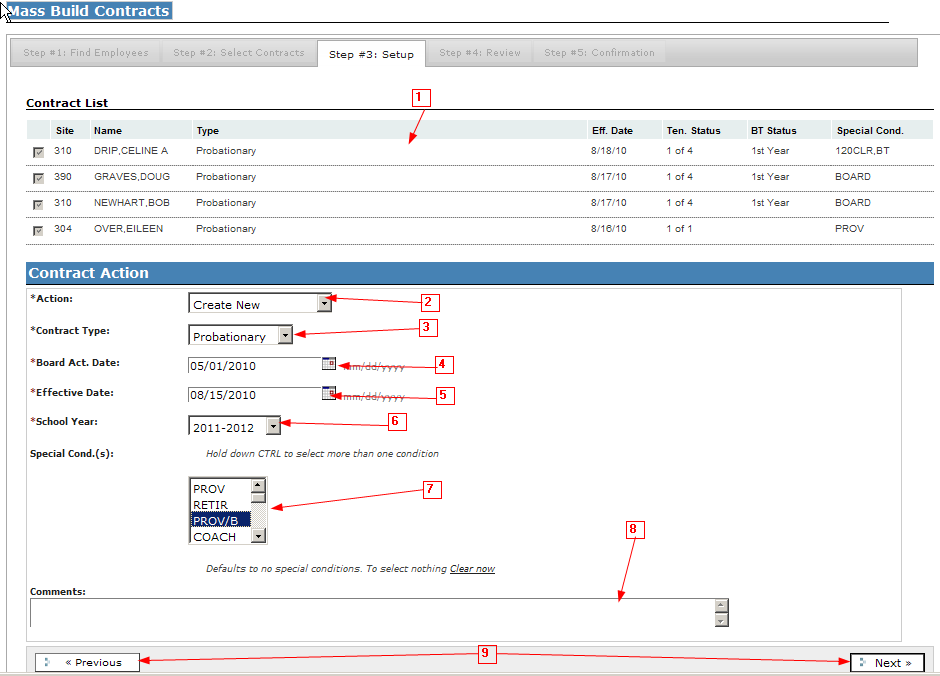
1): The top portion of Step #3 will display the identified employees from Step #2 and all of their associated information. The section labeled Contract Action is where the operator will establish the specific data elements to use in generating the new contracts. The specific elements are outlined below.
2) Action: The options available here are Create New or Inactivate Current. The Create New option will proceed with building new contracts for the identified employees. The Inactivate Current option will only allow the user to inactivate the current contracts for the identified employees. This section provides information about the process when the Create New option is selected. For information about the process when the Inactivate Current option is selected, proceed to “Step #3–If Inactivate Current Option Selected’.
3) Contract Type: The options are the standard state mandated contract types: Teacher, Temporary Full-Time, and Temporary Part-Time. Local Contract Types are not available for mass creation because they are not part of the contract structure in HRMS.
Note: The example provided is for creating Probationary contracts. If the operator elects to create a different Contract Type, the data elements shown in the Contract Action section will vary slightly.
4) Board Action Date: The operator should enter the date the local Board of Education is scheduled to take action on the contract. The date should be entered in mm/dd/yyyy format or select the correct date from the calendar option box beside the field.
5) Effective Date: The actual beginning date (first day on payroll) should be entered as the Effective Date. The date should be entered in mm/dd/yyyy format or select the correct date from the calendar option box beside the field.
6) School Year: The school year term for the new contract.
7) Special Condition(s): In this window the operator should select the Special Conditions to be included in the new contract(s). Multiple Special Conditions can be selected by holding down the CTRL key on the keyboard while scrolling through the various contract condition codes and selecting the other appropriate conditions.
8) Comments: This data entry box is to be used as an internal communication tool for information pertaining to the next renewal / non-renewal review. The information entered here WILL NOT appear on the contract and will ONLY appear within the renewal / non-renewal data returned as a part of the Assignment, Contract, and License contained as an option on the View tab found on the Employee Page.
9): After selection of the specific elements to be used in the new contracts the Next button should be clicked to proceed with building the new contracts. There is a Previous button if the operator needs to return to Step #2.