User Roles: System Administrator
Last Updated: Nov 15, 2013 7:51 am
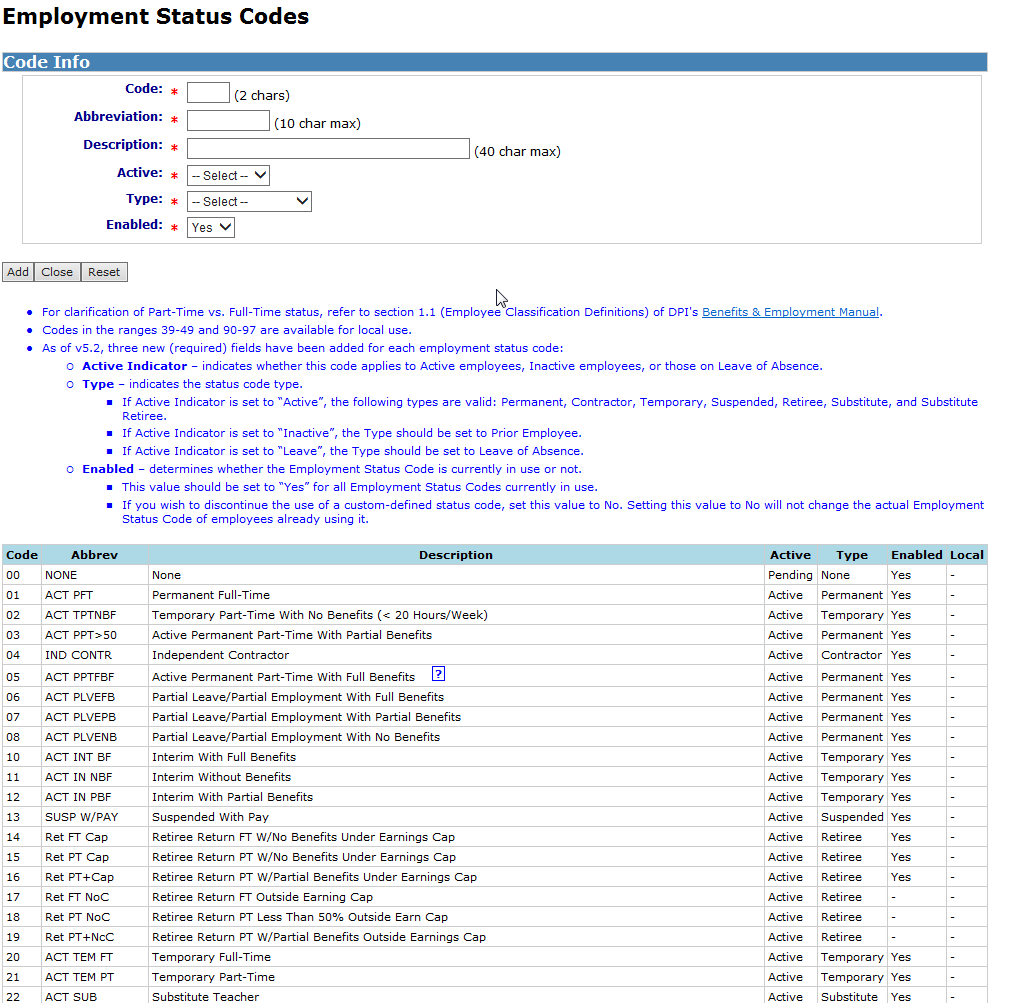
The Employment Status Code configuration form allows you to view both system and locally-defined employment status codes. Locally-defined employment status codes can be added, edited, enabled, or disabled.
To access the form, go to: HRMS Home > Setup > LEA Configuration > Employment Status
The Employment Status form will display. (See below).
- The last column, "Local", indicates if the Employment Status Code is a "System" or "Locally" defined code.
- A "-" in this column indicates a System Defined code. "System" codes cannot be edited.
- A total of 19 codes (39-49, 90-97) are available for Local Use.

Adding a Locally-Defined Employment Status Code
System Administrators may add new Employment Status Codes.
To add a new Employment Status Code:
- Code: Enter the 2 digit Employment Status Code (must be in one of these ranges. 39-49, 90-97).
- Abbreviation: Enter up to 10 characters for an Abbreviation. (This is what is seen in the Employment Status dropdown box throughout HRMS).
- Description: Enter up to 40 characters as a more detailed description.
- Active: Select the Active Indicator
- Active - Staff with this status are considered "Active"
- Inactive - Staff with this status are considered "Inactive"
- Leave - Staff with this status are considered "On Leave of Absence"
- Pending - Do not select this status. Reserved for Code 00
- Type: Select the status code "Type". Options are:
- Select one of the following if the "Active" indicator is "Active"
- Contractor
- Permanent
- Retiree
- Substitute
- Substitute Retiree
- Suspended
- Temporary
- Select "Leave of Absence" if "Active" indicator is "Leave"
- Select "Prior Employee" if "Active" indicator is "Inactive"
- Select one of the following if the "Active" indicator is "Active"
- Enabled: Select "Yes"
- Click the "Add" button to add the new locally-defined Employment Status Code
Click the Cancel button to cancel.
Updating a Locally-Defined Employment Status Code
System Administrators may revise any of the values of Locally-defined Employment Status Codes other than the 2 digit code itself.
To edit a Locally-defined Employment Status Code:
- Click on the appropriate Abbreviation link. (Once selected, the information for this Employment Status Code appears at the top of the screen in the "Code Info" section.)
- Update/change selections for editable values. See 'Adding a Locally-Defined Employment Status Code' above for field definitions.
- Click Save. A confirmation message will display and you will be returned to the configuration page.
Click the Cancel button to cancel your changes.
Disabling a Locally-Defined Leave Type
System Administrators may disable any Locally-defined Employment status code.
To disable a Locally-defined Employment status code:
- Click on the appropriate Abbreviation link. (Once selected, the information for this Employment Status Code appears at the top of the screen in the "Code Info" section.)
- Set the Enabled indicator to "No". The system does not physically remove the record but prevents it from display for selection in the HRMS system.
- If you need to resume using an Employment Status Code, you may edit the record and set its Enabled indicator back to “Yes”.
- Click Save. A confirmation message will display and you will be returned to the configuration page.
Click the Cancel button to cancel your changes.